
CyberTracker Manual
(for version V1.01)
By cyberbrain/noname.
Last updated on 14/09/2001
PLEASE NOTE THIS IS A HTML-VERSION OF THE MANUAL. THIS MEANS THAT THE FORMATTING IS FUCKED UP - DOWNLOAD THE WORD97-VERSION FOR A PROPERLY FORMATTED VERSION!!
THIS MANUAL WILL EXPLAIN HOW TO USE THE CYBERTRACKER MUSIC-EDITOR (FOR C64).
Click on one of the following links to jump to the section:
1.2. Where to get new versions, support, report bugs...
1.3. How to play the music in your programs
1.4. What's new in CyberTracker V1.01?
2.1.6. How to replace instruments
2.2.2. How to have more than one track in one file (more songs)
3.2.2.8. Pitch Control-envelope
3.2.3. How to push/pull points
3.2.4. Last words about envelopes
3.4. Vibrato-editor (+appregio)
Cybertracker is a new tracker for the Commodore 64, which brings the power of the tracker-system down to the C64, so you now are able to make those phunky C64-SID-tunes, fairly easy.
Apart from being a tracker, another big difference between the old C64 editors and this one, is that you don't make your instruments by writing some wierd numbers (that even most musicans that i've talked to don't know what means), but you make instruments with graphical envelopes, so you can actually see what you're doing.
These are some of the important features:
- Fasttracker-style pattern-editor
- Instruments made with 8 graphical envelopes (+ a vibrato/apprgio-value)
- Unlimited Instrument-length (up to 21.84 minutes long!)
- Load/save instruments
- Filter on all 3 channels
- Multiple songs pr. file
- Keyboard jazzing in all modes
- More than one (up to 255) pattern-effect on a pattern-line (worlds first!!)
- NEW: Skins! Give CyberTracker the look you want!
1.2. Where to get new versions, support, report bugs...
You get the newest version of CyberTracker, documentation and help-files on:
You can go directly to the cybertracker-section at:
On this site you'll also find some test-tunes, and a lotta instruments you can use in ya tunez. When you've made some tunes, you can send em' to us and we'll put 'em on the web-site. (i urge you to please send them, so that i can see what people does with my tracker - eventhough it's not too cool and eventhough you don't want it released on the website, i still would like to hear it!)
If you got any comments, ideas for improvements, advice, questions, friendmail, hatemail or ANYTHING (even the smallest things), send it to me under:
If you find any BUGS pleeeze write to me and tell me!! (When you report a bug, please try to be as accurate as possible and describe how it can be reproduced to the very detail)
Special thanx to JCH/Vibrants for his brilliant documentations for his JCH-editor. Without this i wouldn't have known what a "hardrestart" was, and even less how to code it. JCH - You rock! Also thanx to Stryyker/Tide/Onslaught for explaining to me how to do a PRINT# in machinecode, so i could read the dir!
Finally, thanx to the members of NoName for thorough betatesting and for keeping my spirit high... Also thanx for all the response i got about CyberTracker1.00!!
1.3. How to play the music in your programs
At the time of writing, i haven't made a packer to pack it into a normal $1000-tune yet. This means that you can't use the music in demoz, games n' stuff yet. The packer will hopefully be ready soon. Stay tuned to our website! Meanwhile send your songs to our website, if ya wanna get em' out to the public.
1.4. What's new in CyberTracker V1.01?
CyberTracker V1.01 is just a minor update, i've coded in the breaks of coding the packer, to fix some untied ends. The biggest improvements:
- You can now use SKINS in CyberTracker!! (<- change colors/charset) You make
those skins - or configurations - in the configuration-maker, which is a
seperate program on the CyberTracker-disk.
- The wavefrom/bandpass/pitchcontrol-envelopes are now drawn in a more logical
way, that shows how they change the sound, so hopefully less confusion...
- saved files are smaller (=> faster loading/saving + more tunes pr. disk)
For the complete list of improvements look at the "history"-section. CyberTracker V1.02 will be (if all goes after the plan) a major update with much more pattern memory than V1.00/V1.01 + more cool and urgent stuff. (like better hardrestart, different hardrestart-settings for each instrument and better arpeggio) (NOTE: CyberTracker V1.00 can't load files from V1.01.)
Using cybertracker is fairly easy (especially if you know how to use other trackers f.e. fasttracker), however you just need some time to learn which keys to press, and the basic concepts of how to do things. If you're used to Noise/Sound/Star/Pro/Fast/Mad-tracker (etc), you should allmost be going allready - all you really need to know are the layout of the keyboard (it's much similiar to the keyboard-layout from the AMIGA/PC-trackers), the pattern-effects (again much like on the AMI/PC), and ofcause how to make instruments in the instrument-editor.
Since decimal numbers are not used in the tracker, you should know the hex-decimal number-system. All numbers with a "$"-sign before them are in hex.
Basicially the tracker has got two main windows. The Patterneditor-screen and the instrument-editor screen. On the patterneditor-screen you compose your music, and on the instrument-editor screen you make your instruments (via graphical envelopes).
You change between the screens by pressing "<-" to go to the main menu and select the editor you wanna go to. (if you 'double press' "<-", you get right into the other mode) You also load/save/clear music from the mainmenu - if you've never seen a tracker before it'ld be a good idea to load a test-tune and play it (you'll find some on our website).
(by the way, you play with F1, stop playing with F3, and play current pattern with F5. LeftShift + "8"/"9"/"0" will turn channel 1/2/3 on or off. "restore" will toggle editmode on/off in the pattern-editor. Also: "<-" means 'ESCAPE' in most modes.)
(NOTE that Left- and Right-shift haven't got the same meanings in most modes!)
While reading this manual, you should be running the tracker on the C64, so you can try the things out while you read. Let's start looking at the patternscreen:
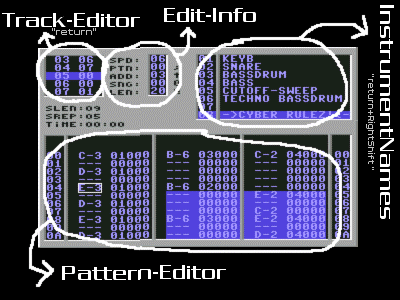
This is a picture of the patternscreen. This screen contains 3 small editors, as you can see on the picture (and 'edit-info' which isn't an editor). I will explain what they mean n' how to use 'em one by one:
This is where you put the notes.
You write music by placing notes on "patterns". A Pattern can be understood as a page of notes. A pattern can be between 0 n' 128 lines long, where each line can contain a note in each of the C64's 3 channels. If you press F1 to play, you will see how the music is played - line by line (you won't hear anythin' if you haven't written anything yet). You can make the pattern longer by pressing "*" and shorter by pressing "*" + Rshift. There's room for 256 patterns in the memory (256 'pages of notes'). You can change pattern with ";" and ";" + Rshift.
A line in a pattern looks like this: "--- 00000 --- 00000 --- 00000".
As there's 3 channels in the SID-chip, you can ofcause have 3 notes playing at the same time. That's why there are 3 "--- 00000"'s - one for each channel.
But what's it all mean? Follow me, and you will know very soon...
The 3 "---"'s are where you write the notes - one note for each of the C64's 3 channels. You write notes, by moving the cursor to one of the 3 "---"-columns, and then press a note-key (most letter & number-keys are note keys - for example "q" will write a C-note under the cursor).
If you press "q" you will see "C-4". The "C-" is the note, and the "4" is the octave number. The octave can be changed by pressing Left/Right-Shift together with F1-F7. Try it out - Pretty easy...
Apart from notes, you can also write a so called "stop"- and a "gate"-note, by pressing "." or ",". "stop" will make the note that's playing immideately shut up, and gate will fade the note out (= start the 'release phase' - see the explaination of the volume-envelope in the instrument-editor for more info).
What's up with "00000"?!
The first two "00"'s are the instrument that the note will be played with. There can ofcause be more than one instrument in a piece of music, so this is where you can control which instrument you want the note to be played with.
For example "D#3 05" means that the note D# in octave 3 will be played with instrument 05.
(when writing a note - like explained above - the 2 "00"'s will automatically get the instrument-number you've chosen in the InstrumentName-Editor. Use "+"/"-" to select instrument.) (Instrument 0 is special. If you write instrumentnumber 0, the player will play the note with the last used instrument in the channel)
Whattabout the last 3 "000"'s??
Apart from writing notes and instrument-numbers, you can also write an effect on each pattern-line. That's what the last 3 "000"'s are used for. The first "0" is the effect-number, and the last 2 "00"'s are the effect-parameter.
For example, the effect called "2" will slide the pitch down. "208" will slide the pitch down by the speed 08. (See appendix B to see which other effects are avaliable.)
A final note: if a pattern looks like this "--- ----- --- ----- --- -----", it's because it's zero lines long. Press "*" to make it longer.
Well, now you know what you basically need to know about the pattern-editor. For the complete list of avaliable keys, see the "keys"-chapter. You will learn some things which makes it easier to edit a pattern, if you read on:
You can mark a block, by pressing Left-Shift while moving the cursor. A block will let you transpose, replace and cut/copy/paste just a part of the pattern, instead of the whole pattern.
You can easily cut/copy/paste in the pattern-editor. You can either cut/copy/paste the entire pattern, only one channel or the marked block.
You do that by pressing 2 keys together - one key which tells if you wanna do it on the pattern, channel or block, and one key which tells if you wanna cut, copy or paste. These are the keys:
STOP : Channel "3" : Cut+Copy
CBM-KEY : Pattern "4" : Copy
LEFT SHIFT : Block "5" : Paste
For example CBM-KEY + "4" will copy the pattern, which later can be pasted with CBM-KEY + "5".
2.1.5. How to transpose notes:
You can transpose notes up/down. How you do it, is very similiar to how you cut/copy/paste. You press one key together with another:
STOP : Channel "1" : Transpose up (all instruments)
CBM-KEY : Pattern "2" : Transpose down (all instruments)
LEFT SHIFT : Block "6" : Transpose up (current instr.)
RIGHT SHIFT: ALL patterns "7" : Transpose down (current instr.)
"Q" : Goto transpose-menu.
For example, pressing STOP + "Q" will goto the transpose-menu and transpose the channel. (you can do all transposing from the transpose-menu if you want)
2.1.6. How to replace instruments:
If you have written some notes with one instrument, and later wants to play them with another instrument instead, you can change the instrument-number they will be played with easily, with the "replace instruments"-function.
It works much like how you cut/copy/paste and transpose. You must press
STOP/CBM-KEY/LEFTSHIFT/RIGHTSHIFT together with "R".
There're more patterneditor-keys avaliable - check the key-chapter...
The track-editor is used to enter which order the different patterns will be played in, when the song is playing. A "track" is simply an order of patterns. You enter the Track-Editor by pressing "return" from the Pattern-Editor.
The track-editor has 2 columns - the left column is the line-number in the track-editor (u can't change those), and the right column are the number of the pattern that will be played on the line. (There are 256 patterns in the mem, and each pattern has a number from $00 to $FF.)
For example:     00 00
                 01 01
                 02 01
                 03 65
                 04 1A
will play pattern 00 first, 01 two times, 65 and finally pattern 1A. After having played the last pattern ($1A), it'll start from the beginning again.
You move around with the cursor-keys, and you can insert/delete lines by pressing insert or delete.
Note, if the track-window shows "-- --", it means that the track is 0 lines long - press insert to insert a line.
If you don't want the music to start from line 00 again after last line, you can press "R" on the line you want it to restart from instead. ("srep: xx" tells which line it'll restart from)
2.2.2. How 2 have more than one track in one file (more songs):
Yes, there can be more than one song in one file in Cyber-Tracker, just like there can be in most other C64-MzxEditors. But what exactly do i mean when i say 'song'?
A song is simply a track - that means that all songs share the same patterns/instruments/whatever, the only difference between songs is which patterns that will be played after eachother (And that's what you're editing in the track-editor, remember?).
You can change between the songs by pressing "@" or "@"+Rshift. Try pressing it and see what happens... (answer: the track in the track-window changes)
(Again: There're more keyz avaliable - check out the key sexion!)
The instrument-name editor is (suprisingly) where you write the names of your instruments (and also where you select the instrument you wanna use in the pattern editor (by pressing "+"/"-" from the pattern-editor)). You enter this editor by pressing RETURN + RIGHT-SHIFT in the pattern-editor.
The editor is pretty straight forward... It's just a little text-editor. You return to the pattern-editor by pressing return. For the complete list of keys, see the key-section.
The editinfo-"window" (not really a window...) is not an editor, but it'll show you some important information:
SPD: the speed of the pattern (the lower value the faster the pattern will move)
PTN: the number of the pattern you're editing (pattern-number)
ADD: this is the amount of lines the cursor will jump when you write something
SNG: the number of the song you're currently editing in the track-editor
LEN: the length of the current pattern (measured in lines)
You might've noticed the ";","
","@","*" symbols next to the numbers. Those are the keys you gotta press to change the value that it's next to. For example, ";" will increase the pattern number, and RightShift+";" will decrease the pattern-number.You can't change the speed by pressing keys - it must be changed with the Fxx-effect (see the effect-chapter).
You enter the Multi-effect editor by pressing "Ł" from the pattern-editor. This editor is used for having more than 1 effect on each pattern-line (an effect is the last 3 "000"'s, remember??) - Actually this is THE FIRST TIME i've ever seen this option in ANY TRACKER on ANY COMPUTER, so this is a worlds 1st! Arryear!
You might not need this editor in the beginning, but there will probably come a time where you would like to have 2 or more effects on one line, instead of just 1 effect. That can be done by using the "Dxx"-effect.
BUT HOW?!
When you enter the editor you will see a table like this:
## Dxx
01 000
02 000
03 000
04 000
The "000"'s in this table means exactly the same as the 3 last "000"'s in "--- 00000" does in the pattern-editor. Thus this is just a list of effects.
The list is $FF lines long (line $00 is not used). What you gotta do when you wanne use the effects you write here, is to jump to one of the lines, from the pattern-editor.
You jump by using the Dxx-effect in the pattern-editor, where "xx" is the linenumber you wanna jump to in the multieffect-editor. The player will then jump to the linenumber and execute the effect you've written on that multieffect-line, and continue executing all the effects on the lines below, untill it meets an "END"-command.
You make an "END", by moving the cursor to the column after the 3 "000"'s and press "E" (for end).
--------------------------------------------------------------------------------
Example:
Let's say, you wanna carry out the effects: "112","E01" and "456" on the same pattern-line.
Just for fun let's write it from line 2 in the multieffecteditor (could be any line), like this:
02 112
03 E01
04 456E
The "E" on line 04 is important coz' that means "END" - if you forget "END", it will just continue untill line $FF (or another line with an "END").
The 3 effects are now in the multieffect-editor. To execute the 3 effects from the pattern you must write "--- 00D02". When the player meets that line it will jump to line 2, and carry out the 3 effects we've written there.
--------------------------------------------------------------------------------
Two final notes: You should know that if you stand on a pattern-line on a channel with a Dxx-effect and press "Ł", it'll jump to the line Dxx points to.
If you write D00 it'll NOT jump to line 00. When playing it'll use the last used effect-parameter instead of 00. (like many other effects does when the effect-parameter is 00)
If you insert/delete a line in the multieffect-editor, all the references to the below lines (in the patterns) will be added/substracted by one, so they still point to what they pointed to before. (So you don't have to change all Dxx-effects in all the patterns yourself)
E.g. If you've written "--- 00D74" and insert a new line on a line smaller than line $74 in the multieffect-table, the pattern-line will change to "--- 00D75". Geddit?
F.B:I WARNING!
"BE WARNED!!! You are allowed to jump around in the tables, by using Dxx in the editor itself, but beware of making 'inifite loops' - loops that never ends. If you however, by accident have made one of these, the player will stop playing when it meets the 'inifite loop' (because the loop never ends, so it will keep executing effects forever) - no problem, though: just press "RESTORE" to get back the pattern-editor, and correct the problem."
(Once again: look in the key-section for avaliable keys, arrite?)
This is a picture of the instrument-editor screen. This screen contains several small editors, as you can see on the picture:
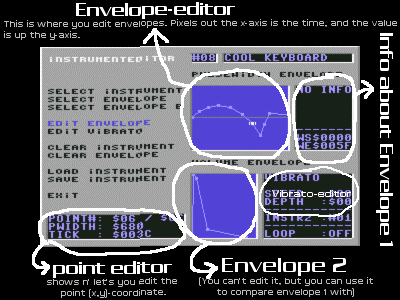
You enter the instrument-editor by pressing "<-" from the pattern-editor, to goto the main-menu, and then select instrument-editor (or double-click "<-" from the pattern-editor). The instrument-editor is ofcause where you make your instruments, and this is where the real power in CyberTracker is. However, you first have to learn how it works... Again, i will explain what the editors mean n' how to use 'em one by one:
3.1. The instrument-editor menu
When you enter the instrument-editor, you will first find yourself in the menu in the left side of the screen. I think most of the menuitems are pretty selfexplaining really, but let me explain those which are not. (by the way, pressing "crsr->" is a quick way to go into the envelope-editor)
This is where you actually make your sound (except for the vibrato/appregio). It's really different from other C64 instrument-editors, but more similiar to PC instrument-editors. The big difference is that you don't have to write thousands of numbers (that you might not compleately be able to figure out what means), but you make it all with graphichal envelopes instead.
How an instrument will sound is defined by 8 envelopes (it is important that you remember that a sound is made by the 8 envelopes!)(except for vibrato/appregio). Each of the 8 envelopes does something different to the sound. Before i tell you how the different envelopes affects the sound, i will first tell you how to edit the envelopes:
An envelope is made of some points, each connected to the next point by a line. The points are those you can move around, to make your instruments.
The envelopes are just like any normal mathematic-envelopes. The time is out the x-axis (so the loger to the right a point is, the longer time it will take untill the computer will reach it), and the value is up the y-axis (so the longer up the point is, the higher value it has). The time is measured in ticks (see appendix E).

Example of an envelope:
(as you see there are 5 points
in this envelope. The computer
will execute the envelope from
left to right, when playing the
envelope)
There are two envelope-windows. The upper window is the window where you can edit stuff, and the lower window is only a window where you can see (but not edit) another envelope - only useful if you wanna compare two envelopes with eachother. We will spend our time in the upper window.
Go into the envelope-editor. You start in the "volume-envelope", but that envelope is a little unordenary as some points can't be moved normally (so i'll save that one for later), so press "+" to select the next envelope (you could also have done that with "select envelope" in the menu instead of pressing "+" (ofcause you can press "-" again to go back to the previous envelope)). You should now be in the 'waveform-envelope'.
To insert some new points press "insert" on the keyboard a few times. There're now a few points in the envelope, and you can move the 'point-cursor' with the cursor-keys. To move a point, press "LEFT SHIFT" together with the cursor keys (You can see the (x,y) position of the point you've selected, in the 'point-editor'). You can ofcoz' delete points again by pressing "delete".
This is all there is to it!
You might wanna know that you can turn loop on/off by pressing "L", and you set the loop-Start by pressing "S"+Rshift.
Now let's see what the different envelopes means to the sound: (Again, see the key-chapter for more avaliable keys.)
As said before the instrument is made out of 8 envelopes. Each envelope does something different to the sound. This is the avaliable envelopes:
Volume-envelope
Waveform-envelope (only points)
Pulse Width-envelope
Filter Pass-envelope (filter) (only points)
Cutoff-envelope (filter)
Resonance-envelope (filter)
Pitch-envelope
Pitch Control-envelope (only points)
Unless you're REALLY new to C64-sound, i guess you're able to figure out what much of it means. If you are really new, don't worry...
(if you're really new to C64 music-making i advise you to not changing the filter-envelopes, before you've learned how to use the other envelopes)
! You can allways test the sound by pressing a note-key! (for example "q") !
(Note: to get any sound, you must first select a waveform other than 0 in the waveform-envelope!!)
With this envelope you control the volume - the higher y-value the higher volume. Nothing complicated about that.
/* - - - - - - - - - - - - - - - - - - - - - - - - - */
However, since this envelope is build upon the SID-chips build-in ATTACK/DECAY/SUSTAIN/RELEASE-envelope (ADSR), the 1st,2nd,3rd and last point can not be moved like normal points.
1) The 1st point can't be moved at all (=> the volume allways starts in $0).
2) The 2nd point (the "ATTACK-POINT") can't be moved up/down, only left/right -
However there's only 16 possible x-values for the ATTACK-point.
3) The 3rd point (the "DECAY-POINT") can be moved up/down like normal points,
but there're only 16 possible x-values for the DECAY-point.
L) The last point (the "RELEASE-POINT") can't be moved up/down + only 16
possible x-values.
Apart from that all the other points (the "SUSTAIN-points") can be moved like normal points. Ya can see da ATTACK/DECAY/RELEASE-values in the info-window.
/* - - - - - - - - - - - - - - - - - - - - - - - - - */
You can see that there's a 'vertical dotted'-line, on the point b4 the last point. The player will stop the envelope at that line, untill you use the "gate"-note in the pattern-editor. Only then it'll continue past the vertical-line. (If you gate before the player has reached the vertical-line, it'll immediatelty jump to it and continue from there - it will fadeout from the volume there's playing you gate'ed it - this means that it will not turn the volume up/down to the volume of the point at the vertical-line.)
You can understand "gate" as a fadeout-function.
(NOTE: Due to a bug in the SID chip, there'll be short clicks in the volume, if you turn the volume UP, in the "sustain-phase" (after the 3rd point).)
This is where you select your waveforms. The lines between the points has NO effect - only the points them selves! You might think this is a strange way to select waveforms, but it's a pretty easy way to let you change the waveform while the instruments playing.
; - - - - - - - - - - - - - - - - - - - - - - - - - -
The C64 has got 4 build-in waveforms - a waveform is a very short sample that's looped forever. (you probably know samples from sample-editors on the PC) (or you could see it as the shape(=form) of the air-wave sent out of the loud-speakers). These are pictures of the waveforms on the C64:

More than one waveform can be selected at the same time (except for noise, because of a lame bug in the SID-chip). You can see which waveforms you've selected in the info-window next to the envelope-editor.
; - - - - - - - - - - - - - - - - - - - - - - - - - -
If you've selected the PULSE-waveform, you're able to control it's pulse-width. More precisely the pulse-width determins the length of the pulse-cycles that will be high.
This is 3 examples of the pulse-waveform with different pulse-widths:
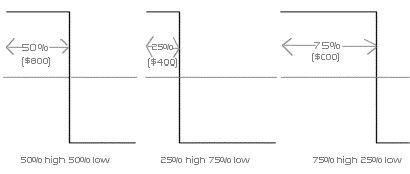
You see the the higher pulse-width the more of the pulse-cycle is high, and the less of the cycle is low. You can't write %-values in cybertracker, but you write a number from $000-$FFF instead, where $000 is 0%, $800 is 50% and $FFF is 100%. (You don't have to know this, really - just play with the values and see how it sounds. (However it's allways nice to know what you're doing, right?))
What you should know, is that the value 'P' (with a value between $000-$800) and the value '$1000-P' will sound EXACTLY the same. For example $700 and $900 sounds the same, because $1000-$700 = $900.
(This is NOT true when other waveforms are selected toghether with Pulse - it's only true for the Pulse-waveform alone!)
This ofcause only have any effect, if the pulse-waveform has been selected.
3.2.2.4. Filter Pass-envelope (FILTER)
This is where you select the filter band-pass and turn filter on/off.
The lines between the points has NO effect - only the points them selves!
If you want filter on your instrument, you turn it on here. You do thay by selecting a filterpass-value else than $0 ($0 means "no filter"). You can see what the the values means in the info-window.
Apart from turning the filter on/off, you also select the filterpass here. The selected filterpasses are written in the info-window.
(if you make the bandpass-envelope 0 points long, there will be filter on the instrument, but it won't change the bandpass-value - can be very useful when using many filtered instruments at the same time!)
(if you don't know what a filter is, you'll find an info-doc on our homepage)
(Remember there can only be ONE filterpassvalue for ALL 3 CHANNELS at one time!)
(this envelope is closely related to the cutoff- and resonance-envelopes)
NOTE ABOUT USING FILTER-INSTRUMENTS IN MORE CHANNELS AT THE SAME TIME:
As said before there can only be one filterpass/cutoff/resonance-value for ALL 3 channels. If you try to use different filter-values in the 3 channels they will fight to get their value sent to the sid-chip. The lowest channel will win - this goes for cutoff and resonance too - lowest channel allways wins when you try to use multiple filter-values at the same time!
However: When an envelope has finished (reached the last point + no loop selected) it won't change the value anymore. This means that if a filter-envelope in the lowest channel ends while a filter-envelope in a higher channel hasn't yet finished, the value from the higher channels filter-envelope will take over (because the instrument in the lower channel doesn't try to change the filter anymore, so the "filter-fight" has ended).
This can be confusing. If you are a control-freak, you probably want to the same instrument to change the filter-values all the time (to avoid confusion). A way to avoid that the instrument in the lower channel ends, is to make a loop in the 3 filter-envelopes of the instrument(s) in the lowest channel, so that it will never end. Another way is to make the 3 filter-envelopes, of the instrument(s) in the higher channel(s), zero points long, so that they won't try to change any filter-values. A third way is just to don't care about any of this, and just see how it'll sound, when the instruments struggles with eachother... (can sound cool!)
3.2.2.5. Cutoff-envelope (FILTER)
This will set the filter's cutoff-value.
(if you don't know what a filter is you'll find an info-doc on our homepage)
(Remember there can only be ONE cutoff-value for ALL 3 CHANNELS at one time!)
(this envelope is closely related to the filterpass- and resonance-envelopes)
3.2.2.6. Resonance-envelope (FILTER)
This will set the filter's resonance-value.
(if you don't know what a filter is you'll find an info-doc on our homepage)
(Remember there can only be ONE resonance-value for ALL 3 CHANNELS at one time!)
(this envelope is closely related to the filterpass- and cutoff-envelopes)
With this envelope you can slide the pitch up/down. The value in the middle ($8000) is the note-frequency. So if the point is in the middle the pitch will be normal. (normally this is the case - it'll be different if pitchcontrol=$1).
3.2.2.8. Pitch Control-envelope
This is where you select the "pitch control".
The lines between the points has NO effect - only the points them selves!
The pitchcontrol-envelope, controls the behaviour of the pitch-envelops.
If the value = $0: The pitch in the pitch-envelope is relative (all'z normal)
If the value = $1: The pitch in the pitch-envelope is absolute - it's value is being sent directly to SID. So the note has got no effect to the pitch - the pitch is the same nomatter which note you play it with. (useful for drums or putting a hihat-noise in the beginning of an instrument)
3.2.3. How to push/pull points
You can push/pull all points after the cursor forward/backwards by pressing "p" or RightShift+"p" in the envelope-editor. "p" will push, and RightShift+"p" will pull.
When you've pressed the keys, you are prompted for the amount of ticks you wanna push/pull the points. As said before, the x-axis is measured in ticks - each pixel on the x-axis in the envelope is one tick. So if you wanna push/pull the points f.e. 5 pixels, you must write $0005. Got it?
3.2.4. Last words about envelopes.
As you can see the 'slide-lines' between 2 points, won't be calculated for the waveform-, filterpass- and pitch-control envelopes. Why not? Because it would make absolutely no sense!
What will happen if you make an envelope 0 points long? If you do that, it'll just use the last used value when it's being played. In other words it won't change any value. (remember, if you make the filterpass-envelope 0 points long, it'll have filter ON (but will use the last used filterpass-value))
When an envelope has finished (reached the last point + no loop selected) it won't change the value anymore.
You enter the point editor by pressing Shift+Return in the envelope-editor.
In this editor you can see which (x,y)-coordinate the point under the cursor in the envelope-editor has. But the -=>fantastic<=- thing about the point-editor is that you can edit the (x,y)-coord (change the position of the point) from here. This is usefull for example if u wanna give the point a very precise y-value.
(Note, that you can't change the tick of the 1st point, as it's allways $0000)
(once again... see key-chaper for keys)
3.4. Vibrato editor (+appregio)
In this editor you can set vibrato on the instrument (You can also use the 4xx-effect to set/change vibrato in a pattern to another value than the one you specify here). You can also set the appregio of the instrument in this editor.
The higher speed the faster vibrato, and the higher depth the more it vibrates.
Vibrato speed should allways be >$F0, coz' else it'll be too fukkin' slow.
If depth = $00, vibrato is off.
The appregio is mispelled in the editor, but i had to make it fit into 7 chars...
Anyway, appregio is a way to make choords by using only one channel. For more info about appregio, see the description of effect 0xx in the "effects"-chapter.
(You don't have to make several identical instruments with different appregio values, if you want to use different choords with the same instrument - just use the 0xx-effect in the pattern-editor to use another choord than the one you've written in the vibrato-editor (you don't even have to write one in the vibrato-editor - you can just use the 0xx-effect all the time))
This windows shows some extra information when the volume-, waveform- and filterpass-envelope is selected.
Volume-envelope: Shows the Attack, Decay and Release values.
Waveform-envelope: Shows which waveforms are selected on the point under crsr
Bandpass-envelope: --||--
Furthermore, it'll show which tick that's on first pixel of the envelope-window (WS='Win Start'), and which tick that's on the last pixel (WE='Win END').
You can load/save music from the mainmenu, and you can load/save seperate instruments from the instrumenteditor-menu. (a rare function in C64-mzx editors)
You can also load a configuration made in the config-editor from the mainmenu.
When you press load or save, you'll get into the disk-menu, where you can either write the name of the file yourself, or choose a file by using cursor up/down.
(the dir will fuck up on 1581-drives, but you can still write the name yourself)
The beautiful "LM"/"SM"/"LI"/"SI"/"LC"-chars in top of the window, tells you if u've selected load/save music/instrument/config.
When LOADing you can use wildcards: "*" and "?", instead of writing the whole filename.
I'm sorry but there's no turbo so it's a little slow (takes about 20-40 secs to load/save music, and 2-3 secs to load/save an instrument), and it's only working with device 8. This will most likely be improved in a later version.
You don't have to be afraid of loosing the song in the memory when selecting LOAD MUSIC, like in DMC, simply press "<-" to get out of the file-selector.
NOTE: CyberTracker V1.01 is 100% compatible with files from V1.00.
(but the other way around is usually not the case (there's about 1/256th
(0.3%) chance that CyberTracker V1.00 can load a V1.01-file successfully))
NOTE ABOUT OVERWRITING: If you overwrite something, the CBM-DOS (yes, i use the build-in dos...) saves the new file before deleting the old one, so at a point both the new and old file is on the disk at the same time (this is to prevent data-loss if a disk-error should occour while saving). This means that there must be enough FREE blocks on the disk for the new file, eventhough you overwrite the old one!!!!! (If you get a "diskfull"-error when overwriting, you should verify the disk to free some wasted blocks - however your old file will not get fucked up if a "diskfull"-error should occour.)
The configuration-maker is a seperate program, which can be found on the CyberTracker-disk. The configuration-maker allows you to 1) change the colors/charset of CyberTracker ("skins"), and 2) Change keyboard settings.
HOW? You make a configuration in the config-maker, save it to a disk. Then you run CyberTracker, go to the mainmenu, and load the configuration-file you've just saved. Weee!
If you save the config-file as "cybertracker.cfg" on the same disk as CyberTracker it will AUTOMATICALLY load when CyberTracker starts up.
Since i don't bother writing a whole lot of text about the config-maker, and i think everything pretty much explains itself, i'll just tell you the FEW things that might not be something you could guess:
SPECIAL KEYS: What you might wanna know is that you can press "space" to se a preview of how the colors will look on the pattern-screen. In the color-editor you can use "+"/"-" to browse through the colors. When you're in the menu in the leftside, you can use CSR_RIGHT to go to the color-editor.
The charsets you can load are totally normal singlecolor C64 1x1-charsets (with no header or anything). You can use (allmost) any C64-chareditor to make the charsets. It will only load the first 64 chars ($200 bytes).
...Why's diz important, u may ask. Colors gets you in a special mood. Music is much about moods, so it's important to be in the right mood while composing, and the right colors can help you get there. (+ also it looks cool)
The keyboard-layout is very similiar to the one in FT2 on the PC, however since this is a C64-keyboard it can't be identical. Please note that LEFT- AND RIGHT-SHIFT DOESN'T HAVE THE SAME MEANING in most modes!!
All modes:
F1
= Play songF3 = Stop playing
F5 = Play current pattern
Rshift + F1-F7 = Change octave (1,3,5,7)
Lshift + F1-F5 = Change octave (2,4,6)
(in most modes note-keys (most number/letter-keys) will play a note)
(in most modes '<-' will work as an 'ESC'-key)
"Pattern Editor"-Keys:
This is the mode you are in, when the tracker starts.
editing:
Most number/letter-keys
= notesSpace = Insert space (delete note/number at cursor)
, = Insert 'gate' (═══)
. = Insert 'stop sound' (X)
Del = Delete line at cursor + move all lines under cursor 1 line up
Insert = Insert a new line + move lines under cursor down(deletes last line)
cursor movement:
Crsr
= Move cursorHome = Move cursor to first line
Clr = Move cursor to last line
Ctrl(+Lshift) = Tab (move cursor to next/prev channel)
/ (+Rshift) = Move cursor 16 lines down/up
Block marking:
Press Lshift together with the "cursor-movement"-keys, to mark a block (except ctrl)
cut/copy/paste:
Press Stop / C= / Lshift (Channel/Pattern/Block) together with:
3 = Cut + Copy
4 = Copy
5 = Paste
Transpose/Replace-Instruments:
Press Stop / C= / Lshift / Rshift (Channel/Pattern/Block/All patterns) together with:
Q = Transpose menu (you can do all transposing from here)
1 = Transpose 1 note down (all instruments)
2 = Transpose 1 note up (all instruments)
6 = Transpose 1 note down (current instrument)
7 = Transpose 1 note up (current instrument)
R = Replace instruments
Change 'Edit-info'-values:
;
(+Rshift) = Next/Prev pattern
(+Rshift) = Increase/Decrease Add@ (+Rshift) = Increase/Decrease song-number
= (+Rshift) = Scroll trackwindow one line up
* (+Rshift) = Increase/Decrease length of pattern
* + Lshift = Make pattern $20 lines long
Other functions:
+
= Increase selected instrument number- = Decrease selected instrument number
8/9/0+ Lshift = Channel 1/2/3 on/off
Restore = Editmode on/off
jump to other editors:
Return
= Goto Track-editorReturn+Rshift = Goto InstrumentName-editor
Ł = Goto multieffect editor
¬
= Goto MainMenu (double press to go to the instrument-editor)"InstrumentName Editor"-Keys:
To get into this mode, you must press Return + Rshift from the pattern-editor. (you can't edit instr#0's name)
Crsr
= Move cursorDel = Delete char
Inst = Insert space (only possible if last char in the name is a space)
Stop = Undo changes for a line (works only for the line under cursor)
Return = Accept changes
Home = Move cursor to the first letter
Clr = Move cursor to the last letter
"Track Editor"-Keys:
To get into this mode, you must press Return from the pattern-editor.
Crsr
= Move cursor/ = Move cursor 16 lines down
/ + Rshift = Move cursor 16 lines up
Del = Delete line at cursor
Insert = Insert line at cursor
Home = Move cursor to line 0
Clr = Move cursor to last line
+ = Increase value at cursor
- = Decrease value at cursor
; = Increase value at cursor
; + Rshift = Decrease value at cursor
R = Set the SongRepeat-value to linenumber at cursor
0-9 & A-F = Change value at cursor
@ = Increase song-number
@ + Shift = Decrease song-number
Return = Exit TrackEditor
¬
= Exit TrackEditor"MultiEffect Editor"-Keys:
To get into this mode, you must press "Ł" from the pattern-editor.
Crsr
= Move cursor/ = Move cursor 16 lines down
/ + Rshift = Move cursor 16 lines up
0-9 & A-F = Change value at cursor
E = If in command-column: Insert "End"
Space = If in command-column: Delete "End"
Stop = Exit
¬
= ExitŁ = Exit
Return = Exit
Insert = Insert a blank line (and Deletes line $FF) + update references
Del = Delete line + update references
Home = Go to line $01
Clr = Go to line $FF
"InstrumentEditor Menu"-Keys:
To get into this mode, you must go to the main-menu, and select it from there.
Crsr
/Ż = Move cursorHome = Move cursor to first line
Clr = Move cursor to last line
Return = Select the item under cursor
Crsr ® = Goto EnvelopeEditor (same as pressing return on "edit envelope")
+ = Next envelope (win1)
- = Prev envelope (win1)
+ + Rsh = Next envelope (win2)
- + Rsh = Prev envelope (win2)
¬
= Goto MainMenu (double-press to go to the patterneditor)"Envelope Editor"-Keys:
To get into this mode, you must select "edit envelope" from the instrumenteditor menu.
Crsr
¬ /® = Select pointCtrl/Ctrl+Lsh= Select point: go 16 points forward/backwards.
Home = Select first point
Clr = Select last point
Del = Delete point at cursor
Insert (Rsh) = Insert a new point
Lsh + Crsr = Move point
Lsh + / = Move point 8 steps down
Lsh + / + Rsh= Move point 8 steps up
Lsh + Home = Move point to the top
Lsh + Clr = Move point to the bottom
Cbm + Crsr¬/® = Scroll envelope-window left/right
+ = Next envelope (win1)
- = Prev envelope (win1)
+ + Rsh = Next envelope (win2)
- + Rsh = Prev envelope (win2)
= Swap win1 <-> win2P = Push all points after cursor left
P + Rsh = Pull all points after cursor right
L = Toggle loop on/off for current envelope
S + Lsh = Set loop start
¬
= Return to instrumenteditor-menuReturn = Return to instrumenteditor-menu
Return+Shift = Goto "point editor"
"Point Editor"-Keys:
To get into this mode, you must press "Return + Shift" from the envelope editor.
Crsr
= Move cursorHome = Move cursor to the beginning of the line
Clr = Move cursor to the end of the line
"+" / "-" = Select next/previous point
¬
= ExitReturn = Exit
"File Selector"-Keys:
To get into this mode, you must choose load/save from the mainmenu or instrumenteditor-menu.
Crsr
¬/® = Move text-cursorCrsr /Ż = Move fileselector-cursor
Inst/Del = Insert/Delete a char
Home = Move fileselector-cursor to the first file
¬
= ExitReturn = Load/Save the file
"Main Menu"-Keys:
To get into the mainmenu, press "
¬ " from either the pattern-editor or the instrument-editor.Crsr
= Move cursorHome/Clr = Move cursor to the first/last line
Return = Select menu-item
¬
= ExitDouble-clicking "
¬ " is a fast way to go from/to pattern-editor to/from instrument-editor.
That was the keys... If you find some secret keys be sure to let me know!! (WHAT?!) Err...
0
xx: Appregio1
xx: Portamento up (frequency slide up)2
xx: Portamento down (frequency slide down)3
xx: Tone portamento (frequency slide to tone)4
xx: Vibrato5
xx: Cutoff-add slide up6
xx: Cutoff-add slide down7
xx: Set Cutoff-add ($80=no add/sub, <$80=sub, >$80=add)8xx:
-9xx:
-A
xx: PulseWidth slide upB
xx: PulseWidth slide downC
xx: Set sustain (allmost "set volume"...)D
xx: Multi EffectE
yx: 0x: Toggle filter on/off on channel (0=off/1=on)1x:
Set attack2x:
Set decay3x:
Set release4x:
Set waveform5x:
-6x:
-7x:
Set Resonance8x:
Test/Synchronization/Ringmod/Gate9x:
Set filter passbandAx:
-Bx:
-Cx:
Set Global Volume (Default: $F) (instead of Gxx)Dx:
Pattern Break (instead of Dxx)Ex:
Skip note hard-restart (0=normal/1=skip hardrestart)Fx:
-F
xx: Set speed (not BPM)
EFFECTS
You can make perfectly cool songs without using any effects at all, but the effects might add a little sumthin' to your song and/or make your composing a little easier. I'll advice you to atleast try out all the effects. Maybe you won't be needing them here n' now, but you should know which effects that's avaliable, so that you know they're there if you're sometime gonna need it.
What's effects? Apart from writing notes in the pattern editor, you can also write some effects. If you're used to FastTracker/Protracker/Madtracker (etc...) you will quickly get the hang on it, as they're very alike in my tracker.
But HOW?! Learn: The last 3 000's in "--- 00000" are the place you write your effects. The first 0 is the effectnumber (where you write which effect you wanna use) and the two last 0's are the effectparameter (tells the effect how you want it done). Easy!
For example there is an effect which slides the pitch up. That effect is called "1". If you want to use effect "1", you gotta write 1 instead of the first zero. You also gotta write how much you wanna slide up. So if you wanna slide up by - let's say - $20, you gotta write "120". Pretty fucking easy, eh? Below is a list of all the effects and a description of what they do.
Note that the effect E is a little different from the others, as the first two 00's are the effectnumber and only the last 0 is the effectparameter.
Also note that some of the effects will reuse the last used parameter if you use the parameter 00.(can only reuse from effects able 2 reuse parameters themselves)
(for FT2 users: the last parameter from any effect, not just from the last time the same effect was used!)
0xy - appregio
syntax: 0 + 1st halftone + 2nd halftone
This effect will use another appregio-value, than the one written in the instrument-editor. If you write "0ff" (zero + FF), appregio will be turned off.
Appregio is a way to make choords by using only one channel, which is very commonly used in C64-tunes. It's done by changing very fast between the notes in the choord, instead of playing them at the same time.
How to make a choord? The first note of the choord is the note written in the note-column. The second note is the note from the note-column plus 'x' halftones and the third note is the note from the note-column plus 'y' halftones.
Example: C-5 00037 <- Tick#1 plays C-5
Tick#2 plays D#5 (D#5 = C-5 + 3 halftones)
Tick#3 plays G-5 (G-5 = C-5 + 7 halftones)
Tick#4 restart again with C-5
(etc...)
Example: --- 000FF <- Turn apreggio off
(NOTE FOR FT2 USERS: When you write an appregio-value in FT2 it will affect only the line it's written on, but in CyberTracker it will continue untill it's turned off or a new note starts)
1xx/2xx - portamento up/down
syntax: (1 or 2) + speed
1xx/2xx slides the pitch of the note up/down, by the speed xx.
If xx=00 the last used parameter will be used.
Example: C-5 00108 <- slides the pitch up by the speed $08
--- 00108 <- slides the pitch up by the speed $08
--- 00208 <- slides the pitch down by the speed $08
--- 00200 <- slides the pitch down by the speed $08 again
3xx - portamento to tone
syntax: 3 + speed
3xx is normally used together with a note. Instead of just start playing the note normally, it will slide to it's pitch. If the slide slides too slow to finish the slide on the line, just make some 3xx-effects on the lines under it.
If xx=00 the last used parameter will be used.
(When 3xx is used together with a note there will be no hardrestart and the envelopes won't be restarted)
Example: C-5 00000 <- Play the note C-5
D#5 00310 <- Slide the pitch up untill it reaches D#5
--- 00310 <- ...If it didn't finish sliding, continue the slide.
4xx - Vibrato
syntax: 4 + speed + depth
This makes it possible to use other vibrato-values, than the ones defined in the instrumenteditor. (if xx=00 vibrato will be off)
(NOTE FOR FT2 USERS: When you write a vibrato-value in FT2 it will affect only the line it's written on, but in CyberTracker it will continue untill it's turned off or a new note starts)
5xx/6xx - Cutoff-add slide up/down
syntax: (5 or 6) + speed
This will slide the cutoff-frequency up/down, by increasing/decreasing an add-value (that will be added to the values from the cutoff-envelope). If xx=00 the last used parameter will be used.
Note that the add-value reached by the slide, will be added to/substracted from the cutoff-frequency in the rest of the song untill the add-value is reset by the 780-effect. (or untill it's slided back again)
Example: C-5 00520 <- Slide the cutoff up
--- 00520 <- Slide the cutoff up
E-5 00000 <- (the cutoff is still above normal)
--- 00640 <- Slide the cutoff down again (is now normal again)
--- 00650 <- Slide the cutoff more down
--- 00780 <- Reset the cutoff to normal!
(remember this will affect all 3 channels)
7xx - Set Cutoff-add
syntax: 7 + add-value
This will set an add-value to be added to/substracted from the cutoff-frequency defined in the cutoff-envelopes. (This is also the value that 5xx/6xx changes)
(if =$80: no add, if >$80: add, if <$80: sub)
Example: C-5 00730 <- Cutoff below normal
--- 00780 <- Cutoff back to normal
--- 007A3 <- Cutoff above normal
(remember this will affect all 3 channels)
Axx/Bxx - PulseWidth slide up/down
syntax: (A or B) + speed
This slides the PulseWidth up/down, by the speed xx.
If xx=00 the last used parameter will be used.
Example: --- 00A54 <- Slides the pulsewidth up by the speed $54
Cxx - Set sustain (allmost "set volume")
Syntax: C + (0 or 1) + sustain(volume)
This will set the sustain, which allmost is the same as setting the volume.
(the sustain-value can't be greater than $0f)
- If you use C0x (which you normally would) it will stop the volume-envelope.
- If you use C1x it won't stop the volume-envelope, so on the next patternline
the volume-envelope will take over again (and forget the C1x value), unless
the envelope has reached it's end. (normally you would not use this)
(NOTE1: The reason why it's not excatly the same as setting the volume: what you write will not be audiable untill after the attack- and decay-phase (the 3 first points) of the volume-envelope has ended)
(NOTE2: this will be used instead of the sustain-value from the volume-envelope, it will not be added to it)
Dxx - Multieffects
Syntax: D + multieffect-linenumber
Dxx will jump to linenumber xx in the multieffect-editor, and carry out the effects written there. Dxx makes it possible to have more than one effect per line (as far as i know this is the first tracker which allows you to have more effects on a line! Respect goin' this way, ya' all! ;] ).
If xx=$00, it'll not jump to line 00, but it'll use the last effect-parameter instead of 00.
NOTE: you are able to jump arround in the tables by using the Dxx effects in the multieffects themselves. But beware of making 'inifite loops' (an inifite loop is a loop which never ends - for example if you on a line in the multieffect-editor jumps to the same line - for more info see the section on the multieffect-editor). If you accidently have made an inifite loop and the player stops, you can press restore to exit the loop. (and you must then correct the mistake (((unless you think it's cool ofcause!))))
NOTE: if u wanna use the 3xx-effect in the multieffect, it must be at the line you jump to (ex: if you write D06 you must make line 6 in the table = 3xx), or the 3xx won't work together with notes.
Example: Multieffecteditor:
02 120 <- 120 means slide pitch up by 20
03 E48 <- E48 means select noise-waveform
04 C08E <- C08 means set sustain=8 (and the E means END)
Pattern Editor:
C-5 01D02 <- This will execute 120,E48,C08 on this line
--- 01D03 <- This will only execute E48,C08
--- 01D04 <- This will only execute C08
E0x - Toggle filter on/off on channel
Syntax: E0 + value
If value=0 filter will be turned off on the channel it's used on, if value=1 filter will be turned on on the channel.
E1x - Set attack
syntax: E1 + attack
Sets the attack to another value than the one defined in the volume-envelope.
E2x - Set decay
syntax: E2 + decay
Sets the decay to another value than the one defined in the volume-envelope.
E3x - Set release
syntax: E3 + release
Sets the release to another value than the one defined in the volume-envelope.
E4x - Set waveform
syntax: E4 + waveform
This will set the waveform. The meaning of the value is the same as in the waveform-envelope in the instrumenteditor.
BITS: 0=TRIangle, 1=SAWtooth, 2=PULse, 3=NoiSE
(This value will be used instead of the one from the waveform-envelope)
(NOTE: DON'T USE VALUES ABOVE 8. If you use values above 8, it means that you select noise together with other waveforms. Due to a sidchip-bug this will lock up the noise-waveform, so that the noise-waveform will be stay silent the rest of the song!)
E7x - Set resonance
syntax: E7 + resonance
This will set the resonance. (for all 3 channels)
(NOTE: this will be used instead of the resonance-value from the resonance-envelope, it will not be added to it)
E8x - Set test/Ring mod/Sync/gate
Syntax: E8 + value
This sets the lower nybble of the "control-register" (this probably only makes sense for people knowing a little about the sid). Support of the synchronization- and ringmodulation-features of the SID-chip are not directly implememted in the tracker, but if you wanna use them anyway, you can use the E8x-effect to turn them on (You can turn voice 3 off with E9x). I won't cover here what synchronization or ring modulation is - read some manuals...
The test-bit will turn the channel off when set to 1. The gate-bit will start the release-phase of the volume-envelope when set to 0, and start the attack-phase when set to 1. (The test- and gate-bit, can also be set/cleared by using the "stop"- and "gate"-note.)
Bits: 0=Gate, 1=Sync, 2=Ring mod, 3=Test
E9x - Set filter passband
Syntax: E9 + passband
Values from 0-7 sets the filter passband. The values means the same as in the 'filter pass'-envelope in the instrument-editor. Values above 8 will turn voice 3 off! (remember this value sets the filterpass for all 3 channels)
Bits: 0=Low-pass, 1=band Pass, 2=High Pass, 3=Voice 3 off
(This value will be used instead of the one from the waveform-envelope)
ECx - Set global volume
Syntax: EC + volume
This will set the global volume for all channels. (Default: $F)
EDx - Pattern Break
Syntax: ED + something
This will stop the pattern the line after it's used (a little wierd but it was easier to code). The parameter has no effect. This is useful when testing a part of the pattern, and like "commenting" the rest below. You shouldn't keep any EDx-effects in your song permanently, coz' all the lines under the EDx effect will waste memory.
EEx - Skip note hard-restart
Syntax: EE + value
This must be used together with a note. If value=1 the hardrestart will be skipped, otherwise it'll be on (like it is normally).
(if you wanna skip the hardrestart but not restart the envelopes, you must use the 3xx-effect. Just set xx to a high value if you don't wanna hear the slide.)
Fxx - Set speed
Syntax: F + speed
Sets the speed of the pattern. The lower the faster the pattern will run.
(The speed actually is the number of ticks pr. line. For example: F06 means that there will be 6 ticks on each pattern-line)
By changing between 2 speeds on each line, you can add some 'swing' to your pattern. The bigger difference the greater amount of swing. (see example)
(This method can also be used to turn the speed just a little bit up/down)
(NOTE1: F00 means "stop".)
(NOTE2: Speeds below 3 will make the hardreset fuck up.)
(NOTE3: If you should wonder... The BPM is allways 125 (on PAL C64's))
Example: --- 00F06 <- set speed to 6 (this line will be 6 ticks long)
--- 00F04 <- set speed to 4 (this line will be 4 ticks long)
--- 00F06 <- set speed to 6 (...)
--- 00F04 <- set speed to 4 - continue like dis, n' u have 'swing'
C. Memory avaliable
The amount of free memory is a big problem, coz' there's very little..! Fear not, coz i will try to optimize my code a lot to get much more free memory in the next version - perhaps by fucking a few of the rarely used functions, and possibly pack the patterns so they'll fill up a minimum of memory. But as it is now, this is the amount of avaliable memory:
Pattern-memory: 796 ($31C) lines (if each ptn is $10 lines long: 49 patterns)
Track-memory: 512 ($200) lines
Envelope-memory: 768 ($300) points
A good idea when making patterns is to make the patterns as short as possible. You can often save many lines, if you just think about what you're doing.
Some specifications: (max, min stuff)
The max. Length of a pattern: 128 ( $80) lines
The max. Length of a song: 255 ($FF) lines
The max. Length of an envelope: 255 ( $FF) points
Number of instruments: 31 ( $1F) instruments
Number of patterns: 256 ($100) patterns
Number of multieffect-lines: 255 ($FF) lines
Max. instrument length: 65536 ($10000) ticks = 1310.72 seconds = 21.84 minutes!!
Some words about the code:
The sourcecode is 619 KB long. (26948 lines!!!) (V1.00 was 25743 lines)
The assembled code fills $9AD9 bytes of memory on the C64. (TOO MUCH!) (V1.00 was $9915)
These are some things i've planned for sum later versions:
- THE PACKER, so that the music can be used outside the tracker!!
- MAKE MORE MEMORY AVALIABLE!!
- Better Hardrestart-code, and different hardrestart-settings for each instrument
- Apreggio with x notes in the choord (instead of allways 3 notes)
- More pattern-effects
- Disk: Support for other devices than device 8
- Disk: turbo loader/saver
- Disk: DOS commands
- Disk: Subdir-support on 1581-drives + Show dir right on 1581-drives.
(i might need some help here - how do i autodetect which track the dir is located at?)
- Disk: The same for FD2000/FD4000/RAMLINK (etc) drives (i need some help to do this)
- Disk: Save patterns
- Disk: Fix some bugs in the dir-code (f.e. my lame rutine shows deleted files)
- Cooler graphics
- Option for making double, trible, quad (etc) speed songs.
- Cut/Copy/Paste envelopes
- Configuration screen (select new colors, load new charsets, set keydelay etc)
- Support for the extra keys on a C128.
- Some way to merge (=append) two modules. (maybe in an external utillity)
- A "don't show zeroes"-option
- Build-in Ansi-C compiler for 68060 processors (??)
- NTSC-playback (hear how the mzx sounds on NTSC(and on PAL if you've got NTSC))
- SID-chip autodectection, that will eliminate the filter differences of new/old-sid
- Special pokémon extensions, skins and patches.
- "Nybbles"?
Known bugs:
- Sometimes when slowly turning up the sustain in the volume-envelope it'll
set the volume to 0 for a few ticks, for some strange reason. (also in C1x)
- If you 'double-gate' (use gate two times after eachother) and has changed
the attack/decay with the E1x/E2x-effects, it will reuse the old attack/
decay-values from the instrument-editor.
(this is a temporarely bug-fix, for another far more evil bug i don't really
know how to fix, and i became bored trying)
- The Attack/decay might not be 100% on the tick the point-editor states, and
there might not be any difference between the fast attacks.
(again a temp bug-fix - i'll get to the bottom of this later)
Got sum cool ideas or found some new bux (or want to help me)? Contact me...
What does "tick" mean? It's a word taken from the AMIGA-trackers. A tick is an amount of time. One tick is 1/50 of a second. So a tick is 50 times faster than a second - thus, a second is 50 ticks. Arrite? (On the C64 this is called 'frames' by coders, but since all other trackers use the word 'tick' i will use that word too).
The fastest the tracker can change values is once pr. tick (=50 times pr. sec).
The tick is important in the envelopes, where the time (x-axis) is measured in ticks, and in the pattern-editor, where the pattern-speed (Fxx) means how many ticks each pattern-line will last.
For example if a point in an envelope is on tick 50 ($32), it'll take a second for the player to reach the point, when playing the instrument.
If you choose the pattern-speed 50 ($32) each pattern-line will take one second.
Ok?
(LITTLE NOTE: If you have an american NTSC-computer, the music will be played slightly faster. On these computers a tick is 1/60 of a sec - not 1/50!)
Since this is the first released version, i haven't been asked any questions about cybertracker frequently, but this is a list of some questions that might would have been asked frequently, if i hadn't allready answered them..:
*Q*: I CAN'T MAKE ANY SOUND. HOW DO I MAKE A SOUND?!?!
*A*: Okay, i'll tell you how 2 do the SIMPLEST instrument ever:
To make a sound, you must first go into the instrument-editor (press '<-'
to enter the mainmenu, and select "instrument-editor"). Go to the
envelope-editor (select "edit envelope"), and press '+' to select the
waveform-envelope. Move the point in the envelope up to any y-value
other than 0 (by pressing 'LeftShift+CursorUp'). Now, press 'q' to test
the sound. (Edit more of the instruments envelopes for a more complex
instrument and eventually add some vibrato/arpeggio)
*Q*: ARRITE, BUT THAT INSTRUMENT KIND A SUX. HOW DO I MAKE A COOL ONE??
*A*: Try looking on our website for docs, or somewhere else on the net.
*Q*: HOW DO I CHANGE THE OCTAVE-NUMBER IN THE PATTERN-EDITOR?!
*A*: Press LeftShift+F1-F7 or RightShift+F1-F7. (it works in every mode)
*Q*: WHEN I USE THE B-7 NOTE IT SOUNDS KIND A' 'OFF-KEY'. WHY?
*A*: Because the B-7 note is above the C64's frequency-range. B-7 is the
only note the C64 (and thus cybertracker) won't play correctly.
*Q*: WHEN I SLIDE AN INSTRUMENT WITH APREGGIO BY USING THE 3xx-EFFECT, THE
SLIDE SOUNDS CRAPPY! WHY?
*A*: Due to some technical stuff apreggio slided from one note to another
with the 3xx-effect WILL sound crappy. I could tell you why this is,
but let me just say that i could fix it, but it would waste a lotta
raster-time (anyway, it's the same in other mzx-editors (f.e. DMC))
*Q*: WHY CAN'T I SEE THE BLUE CURSOR-LINE IN THE INSTRUMENTNAME-WINDOW?
*A*: That's coz you've selected instrument 0. Press "+" to select
instrument 1. (Instrument 0 is a special instrument, that can't hold data
(not a name either). It's only use, is that when you use instrument 0
in a pattern together with a note (ex: "C-5 00000"), the note will be
played with the instrument that was last used in the channel.)
*Q*: OOPS... I'VE MADE AN INIFITE LOOP WITH THE MULTIEFFECT-EDITOR. HAS THE
COMPUTER CRASHED?
*A*: No, just press "restore" to get back, and correct the mistake.
*Q*: I USE CYBERTRACKER WITH AN EMULATOR, BUT WHEN I PRESS CRSR-LEFT OR
CRSR-UP, IT MARKS A BLOCK INSTEAD OF MOVING LEFT/UP! WHY?
*A*: First of all let me congratulate you on being a fucking stupid lamer.
Use a C64, you piece of zjit!! But anyway, the problem is because that
the real C64 only've got 2 cursor-keys (crsr
® and Ż ), so to moveleft/up you must press shift together with the cursor-keys. On the
real C64 you allways use the Right-shift for that, but some emulators
use the Left-shift, and leftshift is used to mark blocks in cybertracker.
You can either configure you emulator to use right-shift, or you can stop
touchin' the pc's
¬ / -keys (use the pc's right-shift together with the®/Ż -keys instead) or you could use a REAL C64/C128!
*Q*: HOW DO I MAKE FILTERED INSTRUMENTS?
*A*: To make filter you use the 3 envelopes: filterpass, cutoff & resonance.
Set the filterpass to another value than $0 to turn filter on and to
Choose the filterbandpass-value. Then select a value in the cutoff and
Resonance envelopes. And thar' ya go: filter! (press "q" to hear it)
(it often sounds cool if you slide the cutoff-value in the envelope)
*Q*: WHATTA MA GONNA DO IF THE TRACKER CRASHES? (A THEORETICAL QUESTION ONLY :)
*A*: If you've got a freezer, then freeze and jump to adress $1500 (go to the
monitor, and type "G1500"). If you've got a reset-button, reset and type
'sys 5376' - NOTE! when resetting inst-names, vib-dpt, song 0-2's lengths,
arpeggio, envelope-loops, song-repeat & multieffect-table will be LOST!!!
(you can do like this, though: POKE 2048,'length of song0': POKE 2049,len1:
POKE 2050,len2 before typing sys5376 to get your song-lengths back)
...and remember to write me and report the bug!
*Q*: I THINK IT'S FUCKED UP HAVING TO INCREASE THE PATTERN-LENGTH OF NEW
PATTERNS ALL THE TIME. IT'S AWKWARD DOING IT CONSTANTLY!
*A*: Well... There is an easy way of making a pattern $20 lines: Lsh+"*"
*Q*: I'VE MARKED A BLOCK IN THE PATTERN-EDITOR AND NOW I DON'T NEED IT ANYMORE
AND IT'S REALLY KIND A' BUGGING ME... HOW DO I REMOVE IT?
*A*: You remove a block this way: Mark a small new block (Lsh+crsr), and don't
release the Lsh-key. Move the cursor back to where the cursor first where
when you started marking the block, and it'll disappear (you can release
Lsh now, by the way). (ex: Lsh+CrsrUp, Lsh+CrsrDown)
*Q*: I USE AN EMULATOR AND THE DIRECTORY FUCKS UP. WHAT'S WRONG?
*A*: Use a C64 (or turn 'Ture Drive Emulation' on).
*Q*: HOW DO I MAKE A NEW PATTERN?
*A*: When you've changed to another pattern, and it looks like this "--- -----
--- ----- --- -----", it's because the pattern is 0 lines long, so you
can't put notes into it, ofcoz. Press "*" to increase the length of the
pattern, so you can fill it with notez.
*Q*: HOW DO I TRANSFER CYBERTRACKER TO MY C64? HELP!! ARGH!
*A*: Look at http://noname.c64.org, there should be a help-section that explains
that.
*Q*: C64 RULEZ!
*A*: That's right!
*Q*: THE PROGRAM DOESN'T WORK WHEN I LOAD IT ON WINDOWS XP! WHY?
*A*: Fuck off!
History of CyberTracker:
14/04/2001 - CyberTracker V1.01
- SKINS!! Make cybertracker look like you want it.
- skins can automatically be loaded at startup
- you can change keyboard settings
- Better graphical representation of the waveforms (the waveform-, bandpass-
and pitchcontrol-envelopes are now drawn more logical)
- The saved files are shorter (not allways 53 blocks - it doesn't save the
*entire* memory anymore)
- Faster dir-scrolling in the fileselector
- BUGFIX: If device#8 isn't turned on when selecting load/save it doesn't
crash anymore
- BUGFIX: If no disk is in drive when loading the dir, it says "error",
instead of trying loading from nothing.
- BUGFIX: The keyrepeat doesn't somtimes stop, when playing the music anymore.
- + misc bugfixes and optimizations.
17/04/2001 - CyberTracker V1.00 (released atmekkasymposium)
First public version released. (5 internal beta-versions were made)
Cybertracker is a project of mine which i've been workin' on 4 bout 4 years now. Not allways too intesively though, but finally it's done, and i can present it to y'all. This is a dream of mine cummin' true. When i started doin' it, it was because i really wanted to do my own music for my demos, but i found DMC, Future composer, JCH-editor (and all the others) far too hard for me to use. I knew protracker/fasttracker, and couldn't understand why no one had ported those to the C64, cos they were so easy to use, and it was so easy to keep track of the music when making it. For example you could see the notes moving while playing, so that it was easier to know how the different parts of the patterns sounded and easier to find errors. But most important, there was one pattern for all channels, and NOT one pattern in each channel like in the C64-editors, so on the PC/AMIGA you actually had a change of knowing which notes that would be played at the same time in the different channels. Another problem in the C64-editors was that you could only start playing from the beginning of a song - so you had to fastforward to the part of the song you were editing EACH time you wanted to hear it. And the way you made instruments in the C64-editors, by writing some wierd numbers, was simply too hard unless you were a hardcore SID-guru (which i wasn't). I began coding, and now it's finally ready for the public... Only the packer is missing. My hope now, is that you'll like it and maybe even use it!
After having released V1.00 an extream number of people downloaded the tracker, and many people contacted me. I want to thank you all for the great response!
Cyberbrain/Noname is out! (phew... what a text-file...)
CyberBrain/NoName
Bjarke N.Laustsen
St.Sct.Mikkelsgade 29,1.sal
8800 Viborg
Denmark
[HANDLE MUST BE ON THE ENVELOPE!]
- For cool swapping / CyberTracker-related stuff
- Actually just any C64-related stuff...
- Just send sumthin' ok?
The C64 Banner Exchange